Cannot upload guest agent’s files to the administrative share – Veeam

Veeam Error when processing a backup job.

Failed to prepare guest for hot backup. Processing HOSTNAME Error: Cannot upload guest agent’s files to the administrative share [\\x.x.x.x\ADMIN$]. Cannot create folder [\\x.x.x.x\ADMIN$\VeeamVssSupport]. CreateDirectoryW(\\?\UNC\x.x.x.x\ADMIN$\VeeamVssSupport) failed. Win32 error:Access is denied. Code: 5

I came across the following error after I configured McAfee EPO access protection policies:

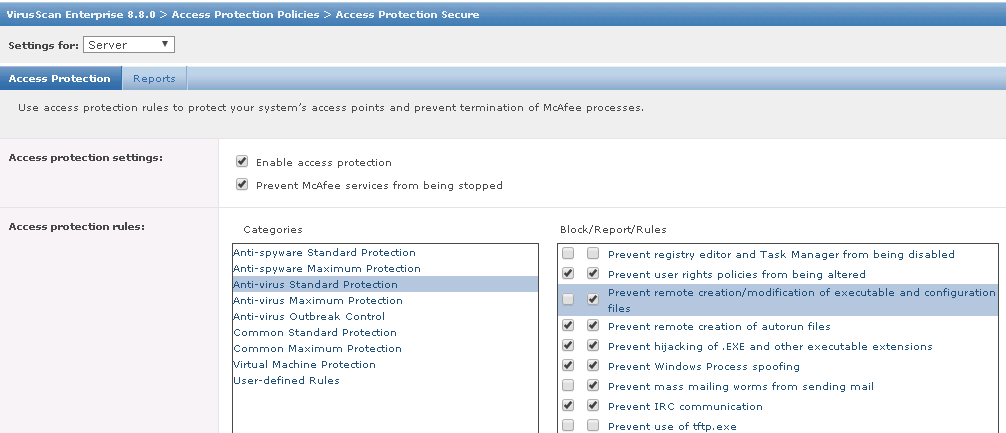
This needs to be disabled in your epo: Anti-virus Standard Protection:Prevent remote creation/modification of executable and configuration files

epo-ap


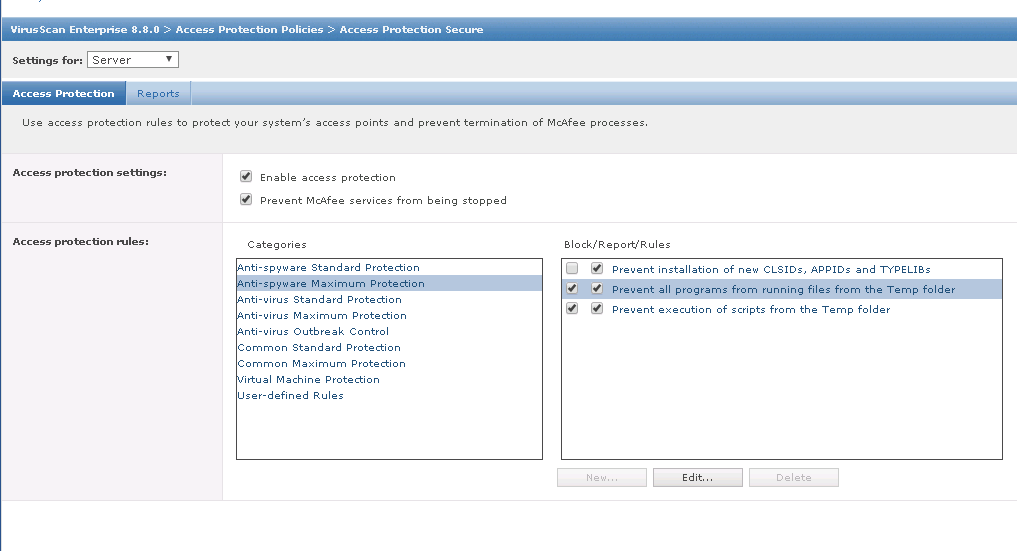
Also you need to give vmtools access to run on your temp folders explicitly.

Anti-spyware Maximum Protection:Prevent all programs from running files from the Temp folder

epo-maxepo-max-details

Use Case Netgear ReadyNAS with SSD and VMware SQL Performance

In my test environment I wanted to see the performance difference when using a Netgear RN422X122 ReadyNas with Sata Drives vs SSD. Here is the NAS.

The NAS was setup using Raid5 as an isci target to my esxi hosts. The SATA drives were Toshiba SATA HDD Enterprise 3.5″ MG03ACAx00 drives. I loaded my test servers which included several app servers and an intensive MS SQL server to simulate a real work environment.

Here was the latest performance for the disk:

disk_latency_sata Netgear ReadyNAS

Notice the highest latency… ouch. Obviously the storage unit and disks weren’t designed to handle this type of load.

Now with SSD we should noticed a huge jump in performance. The drives I used were Intel Solid-State Drive DC S3510 Series.

Using the same configuration and VMs the result were quite different as you would expect.

disk_latency_ssd Netgear ReadyNAS

The sql queries also ran much quicker. The Netgear ReadyNas has held its ground and its a very good option with SSD versus the bigger players. If you are in a tight budget I would definitely consider it.

Oracle Primavera – Database Setup Error

Error:
“WARNING:This operation will destroy existing data in the database:”
Do you wish to continue? (Y or N)y
Exception in thread “Main Thread” java.lang.NoClassDefFoundError: com/primavera/
database/tools/Dataloader/RunDataloader
Caused by: java.lang.ClassNotFoundException: com.primavera.database.tools.Datalo
ader.RunDataloader
at java.net.URLClassLoader$1.run(URLClassLoader.java:202)
at java.net.URLClassLoader.findClass(URLClassLoader.java:190)
at java.lang.ClassLoader.loadClass(ClassLoader.java:305)
at sun.misc.Launcher$AppClassLoader.loadClass(Launcher.java:308)
at java.lang.ClassLoader.loadClass(ClassLoader.java:246)
Could not find the main class: com.primavera.database.tools.Dataloader.RunDatalo
ader. Program will exit.

Usually you get this error if the directory to the location of the rundataloader.bat file is not on the c drive.

So if you cannot change the directory to the correct drive for example e:\ then you will need to use powershell and try again.

Configure WPAD on Windows Server

To configure WPAD on a windows server you will need the following:

1. A proxy server – see create Ubuntu Squid Proxy
2. A web server that will host the WPAD file
3. A DHCP server that will assign the WPAD file to clients

In this post we’ll assume you have a proxy up and running. So we will need to create the WPAD.dat file first.

On your webserver (in this example we are using Windows Server 2008R2 with IIS enabled). You will need to create a WPAD.dat file.
A wpad file typically looks like this:

 function FindProxyForURL(url,host)
 {


// If URL has no dots in domain name, send direct (no proxy)
	if (isPlainHostName(host))
		return "DIRECT";

// If URL matches, send direct.
	if (shExpMatch(url,"*.somedomain.com*") ||
            shExpMatch(url,"*.google.com*"))  	    	
		return "PROXY 192.168.0.195:3128";
		
// If IP address is internal or hostname resolves to internal IP, send direct.
	var resolved_ip = dnsResolve(host);
	if (isInNet(resolved_ip, "192.168.0.0", "255.0.0.0") ||
		isInNet(resolved_ip, "127.0.0.0", "255.255.255.0"))
		return "DIRECT";
			else return "PROXY 192.168.0.195:3128";
 }

I will have the file placed on the root of my web server: C:\inetpub\wwwroot
File Name: wpad.dat
URL: http://mywebserver.domain.local:80/wpad.dat

Once that is created and you can browse the URL and the file prompts to be downloaded then you can enable it on the DHCP server.

On your DHCP Server (in this example we are using Windows Server 2008R2) you will have to create a scope option 252 (“auto-proxy-config”) with a string value of http://mywebserver.domain.local:80/wpad.dat

To do this, in DHCP, right click ipv4 and select Set Predefined options.
Select DHCP Standard options
Then select add
The name should be: 252 WPAD
Data type: String
String value: URL: http://mywebserver.domain.local:80/wpad.dat (Will be the wpad URL)
Ok and apply.

Now you can enable it within your DHCP Scope.

Expand your scope, then go to scope options.
Right click scope option and select configure options.
Scroll down and select the new 252 WPAD option you created and enable it.
Select ok.

Now you can test it on your network. Restart your computer or ipconfig/renew to retrieve the new details.
Powershell Unlock Account – loop

Powershell script to view user account and unlock the account:

[Note: must run as Domain admin to view account and have ActiveDirectory module installed]

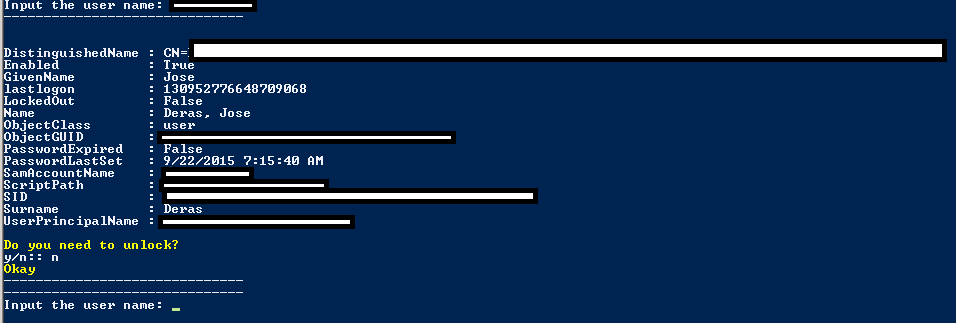
Screenshot:

ADuserinfo

Code:


Import-Module ActiveDirectory
$val = 0
while ($val -lt 1)
{
$username = Read-Host -Prompt 'Input the user name'
get-aduser -identity $username -properties passwordlastset, passwordexpired, lockedout, lastlogon, scriptpath

Write-Host -ForegroundColor YELLOW 'Do you need to unlock?'
$confirmation = Read-Host "y/n:"
if ($confirmation -eq 'y') {
unlock-adaccount -identity $username
Write-Host -ForegroundColor YELLOW 'Unlocked :)'
} else {
Write-Host -ForegroundColor YELLOW 'Okay'
Write-Host '------------------------------'
}
}


Get Computer Serial Number, Model, BIOS WMIC

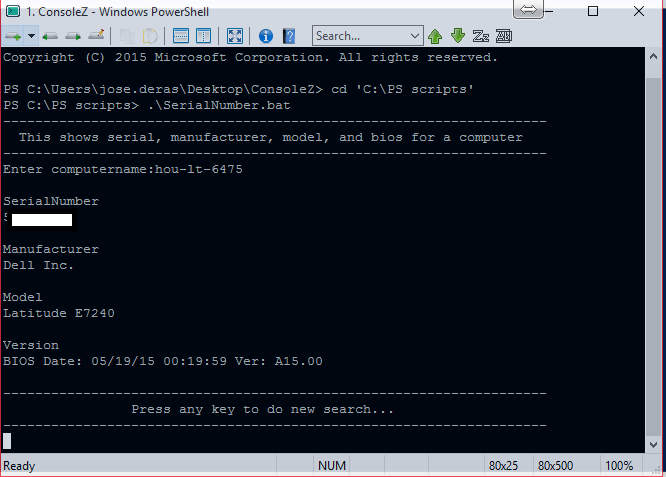
The following is an easy script that searches your domain for the hostname or ip address and retrieves the serial, manufacturer, model, and bios for a computer. Note: You must be domain admin

Screenshot:

Get Computer Serial Number

Code:

:: This bat-file shows serial number, manufacturer and model for a computer
:: Written by JD
:: 12/5/2012
@ECHO --------------------------------------------------------------------
@ECHO This shows serial, manufacturer, model, and bios for a computer
@ECHO --------------------------------------------------------------------
@ECHO OFF 
:TOP
SET /P computername=Enter computername:
echo.
wmic /node:"%computername%" bios get serialnumber
WMIC /node:"%computername%" BIOS Get Manufacturer
WMIC /node:"%computername%" computersystem Get Model
WMIC /node:"%computername%" BIOS Get version
@ECHO --------------------------------------------------------------------
@ECHO Press any key to do new search...
@ECHO --------------------------------------------------------------------
pause >nul
Goto Top